深度解读 Tomcat 中的 NIO 模型
Table of Contents
- I/O 复用模型
- TOMCAT NIO
- 对 IO 模型的支持
- NIO 配置
- 组件
- 源码解读
- 0: 初始化
- 1: 绑定 IP 地址及端口,将 ServerSocketChannel 设置为阻塞
- 2: 启动接收线程
- 3: ServerSocketChannel.accept() 接收新连接
- 4: 将接收到的链接通道设置为非阻塞
- 5: 构造 NioChannel 对象
- 6: register 注册到轮询线程
- 7: 构造 PollerEvent,并添加到事件队列
- 8: 启动轮询线程
- 9: 取出队列中新增的 PollerEvent 并注册到 Selector
- 10: Selector.select()
- 11: 根据选择的 SelectionKey 构造 SocketProcessor 提交到请求处理线程
I/O 复用模型
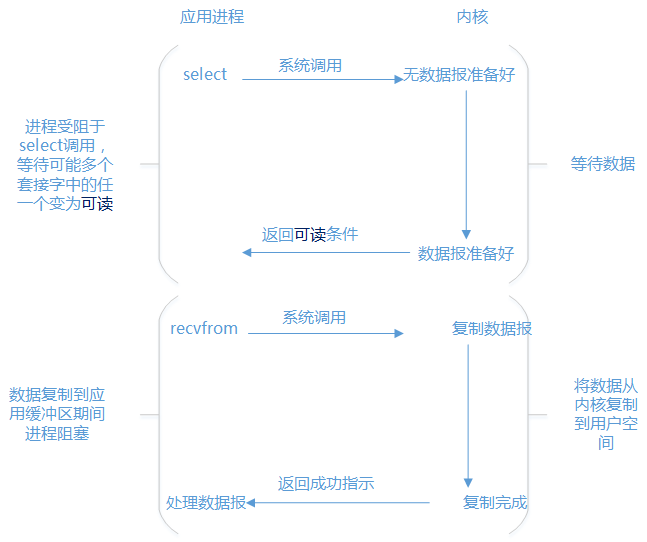
Tomcat 的 NIO 是基于 I/O 复用来实现的:
内核级别
操作系统为代码所处的特权级别分了 4 个级别。不过现代操作系统只用到了 0 和 3 两个级别。0 和 3 的切换就是用户态和内核态的切换:
- 如果进程执行的是用户代码,当前进程处在用户态
- 如果进程执行的是内核里面的代码,当前进程处在内核态
同步非阻塞
I/O 复用模型,是 同步非阻塞 :
- 非阻塞:I/O 读写,对应的是 recvfrom 操作,因为数据报文已经准备好,无需阻塞
- 同步:执行是在一个进程里面执行的
- 阻塞:阻塞在 select 上面,必须等到读就绪、写就绪等网络事件有时候
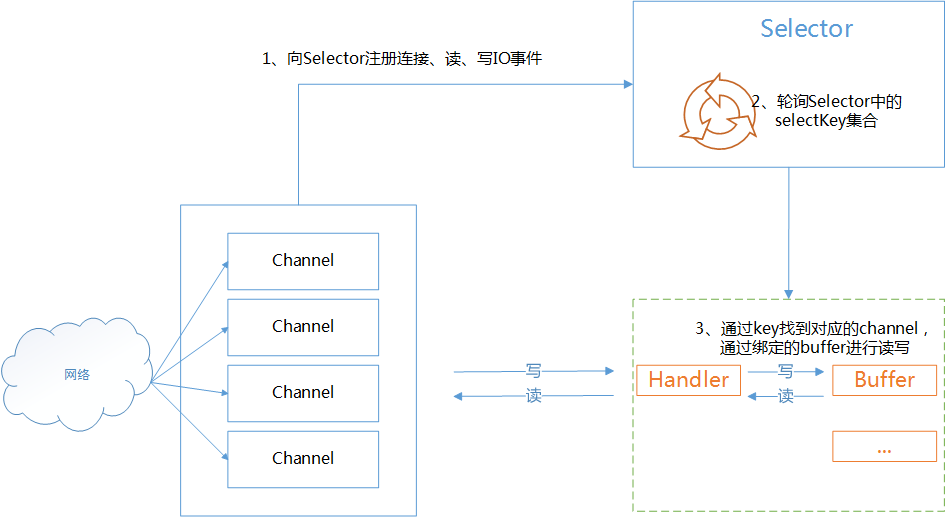
- 多路复用:
- 多路:N 个连接,每一个连接对应一个 channel,或者说多路就是多个 channel
- 复用:多个连接复用了一个线程或者少量线程 (在 Tomcat 中是 Math.min(2,Runtime.getRuntime().availableProcessors()) 个线程)
网络事件:
- 连接就绪
- 接收就绪
- 读就绪
- 写就绪
Selector复用器
I/O 复用主要是通过 Selector 复用器 来实现的:
TOMCAT NIO
对 IO 模型的支持
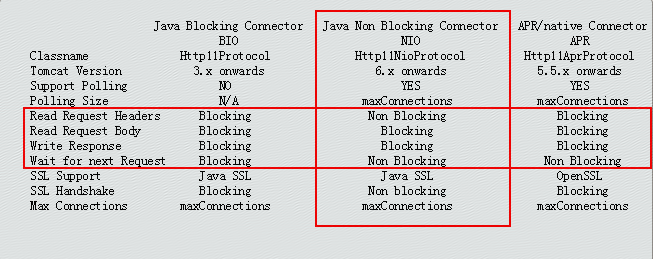
tomcat 从 6 以后开始支持 NIO 模型,实现是基于 JDK 的 java.nio 包。可以看到对 read body 和 response body 是 Blocking 的
NIO 配置
在 Connector 节点配置:
protocol="org.apache.coyote.http11.Http11NioProtocol"
maxConnections=10000
maxThreads=50
Http11NioProtocol 协议下默认最大连接数是 10000,也可以重新修改 maxConnections 的值,同时可以设置最大线程数 maxThreads,这里设置的最大线程数就是 Excutor 的线程池的大小
在 BIO 模式下实际上是没有 maxConnections,即使配置也不会生效

BIO 模式下的 maxConnections 是保持跟 maxThreads 大小一致,因为它是一请求一线程模式
组件
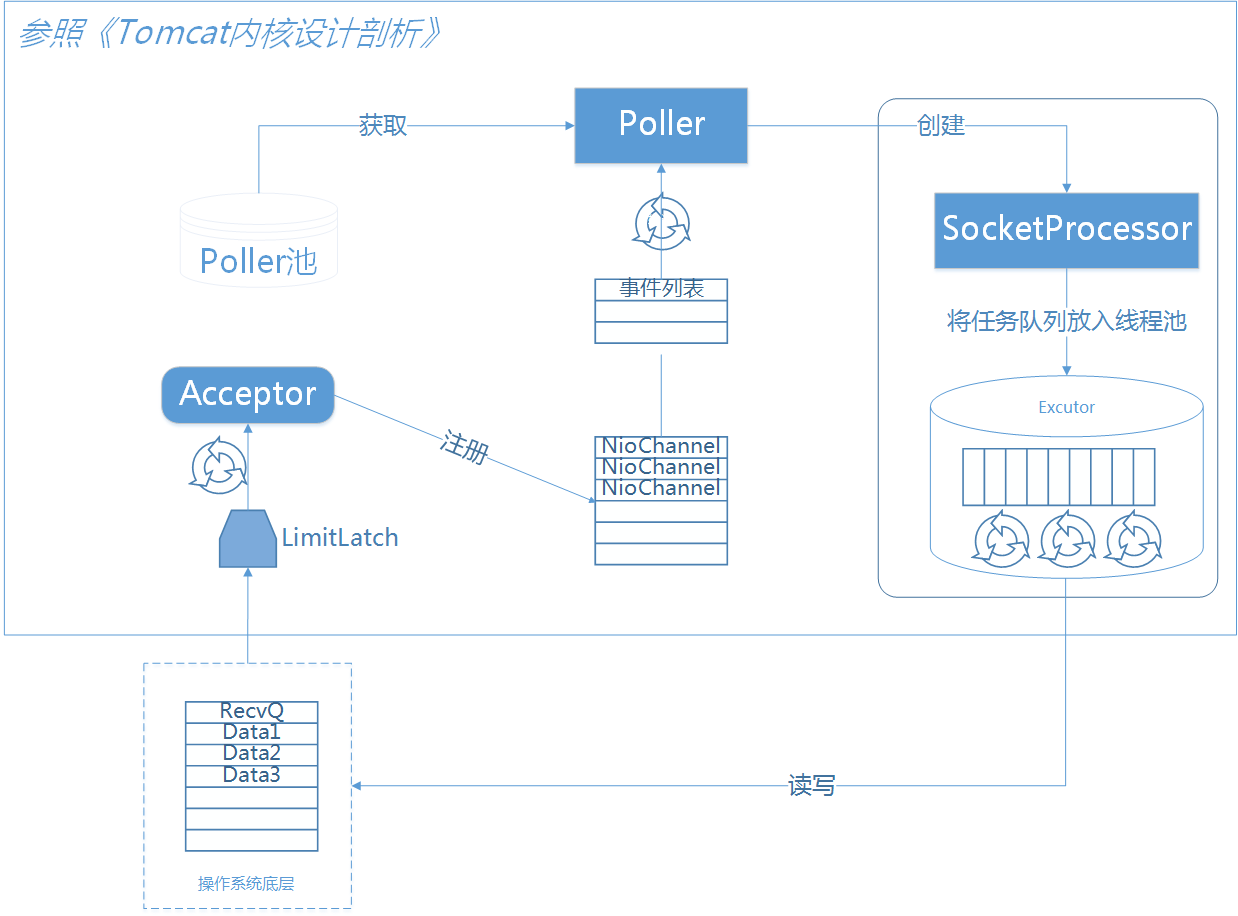
NioEndpoint 一共包含 LimitLatch、Acceptor、Poller、SocketProcessor、Excutor5 个部分:
- LimitLatch :连接控制器,它负责维护连接数的计算,nio 模式下默认是 10000,达到这个阈值后,就会拒绝连接请求
- Acceptor :负责接收连接,默认是 1 个线程来执行,将请求的事件注册到事件列表
- Poller: 来负责轮询,Poller 线程数量是 cpu 的核数 Math.min(2,Runtime.getRuntime().availableProcessors())
- SocketProcessor:由 Poller 将就绪的事件生成 SocketProcessor ,同时交给 Excutor 去执行
- Excutor :线程池的大小就是在 Connector 节点配置的 maxThreads 的值。在 Excutor 的线程中:
- 从 socket 中读取 http request
- 解析成 HttpServletRequest 对象
- 分派到相应的 servlet 并完成逻辑
- 将 response 通过 socket 发回 client
在从 socket 中读数据和往 socket 中写数据的过程,并没有像典型的非阻塞的 NIO 的那样,注册 OP_READ 或 OP_WRITE 事件到主 Selector

而是 直接通过 socket 完成读写,这时是阻塞完成的

但是在 timeout 控制上,使用了 NIO 的 Selector 机制

这个 Selector 并不是 Poller 线程维护的主 Selector,而是 BlockPoller 线程中维护的 Selector,称之为辅 Selector
源码解读
NioEndpoint 执行序列图如下:
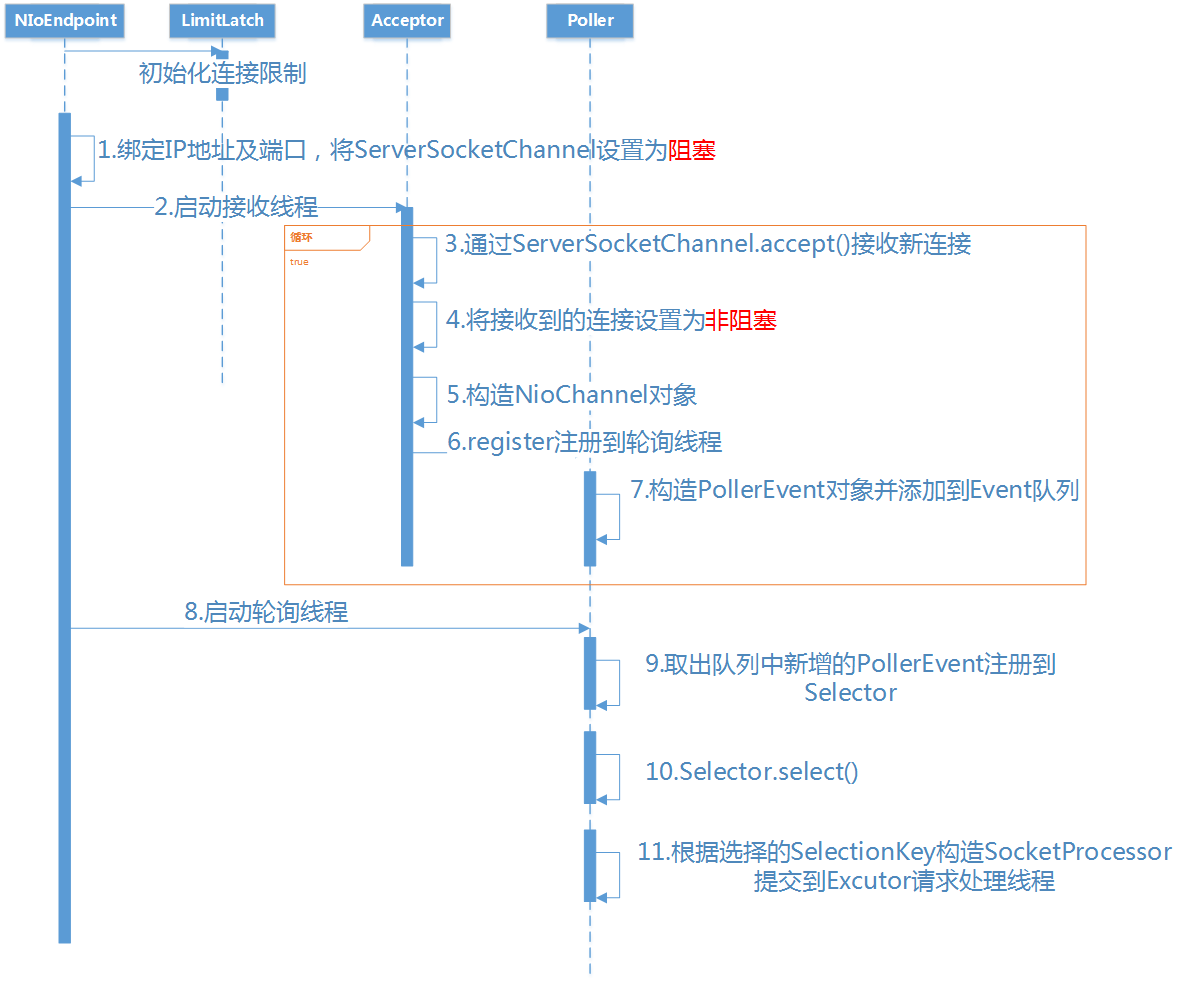
0: 初始化
无论是 BIO 还是 NIO,开始都会初始化连接限制,不可能无限增大,NIO 模式下默认是 10000:
public void startInternal() throws Exception {

        if (!running) {
                //省略代码...
                initializeConnectionLatch();
                //省略代码...
        }
}
protected LimitLatch initializeConnectionLatch() {
        if (maxConnections==-1) return null;
        if (connectionLimitLatch==null) {
                connectionLimitLatch = new LimitLatch(getMaxConnections());
        }
        return connectionLimitLatch;
}
1: 绑定 IP 地址及端口,将 ServerSocketChannel 设置为阻塞
Tomcat 的设计初衷主要是为了操作方便。这样这里就跟 BIO 模式下一样了。只不过在 BIO 下这里返回的是 Socket,NIO 下这里返回的是 SocketChannel:
public void bind() throws Exception {

        //省略代码...
        serverSock.socket().bind(addr,getBacklog());
        serverSock.configureBlocking(true);
        //省略代码...
        selectorPool.open();
}
2: 启动接收线程
public void startInternal() throws Exception {
        if (!running) {
                //省略代码...
                startAcceptorThreads();
        }
}

//这个方法实际是在它的超类 AbstractEndpoint 里面
protected final void startAcceptorThreads() {
        int count = getAcceptorThreadCount();
        acceptors = new Acceptor[count];

        for (int i = 0; i < count; i++) {
                acceptors[i] = createAcceptor();
                Thread t = new Thread(acceptors[i], getName() + "-Acceptor-" + i);
                t.setPriority(getAcceptorThreadPriority());
                t.setDaemon(getDaemon());
                t.start();
        }
}
3: ServerSocketChannel.accept() 接收新连接
protected class Acceptor extends AbstractEndpoint.Acceptor {
        @Override
        public void run() {
                while (running) {
                        try {
                                //省略代码...
                                SocketChannel socket = null;
                                try {
                                        socket = serverSock.accept();//接收新连接
                                } catch (IOException ioe) {
                                        //省略代码...
                                        throw ioe;
                                }
                                //省略代码...
                                if (running && !paused) {
                                        if (!setSocketOptions(socket)) {
                                                //省略代码...
                                        }
                                } else {
                                        //省略代码...
                                }
                        } catch (SocketTimeoutException sx) {

                        } catch (IOException x) {
                                //省略代码...
                        } catch (OutOfMemoryError oom) {
                                //省略代码...
                        } catch (Throwable t) {
                                //省略代码...
                        }
                }

        }
}
4: 将接收到的链接通道设置为非阻塞
5: 构造 NioChannel 对象
6: register 注册到轮询线程
protected boolean setSocketOptions(SocketChannel socket) {
        try {
                socket.configureBlocking(false);//将连接通道设置为非阻塞
                Socket sock = socket.socket();
                socketProperties.setProperties(sock);

                NioChannel channel = nioChannels.poll();//构造 NioChannel 对象
                //省略代码...
                getPoller0().register(channel);//register 注册到轮询线程
        } catch (Throwable t) {
                //省略代码...
        }
        //省略代码...
}
7: 构造 PollerEvent,并添加到事件队列
protected ConcurrentLinkedQueue<Runnable> events = new ConcurrentLinkedQueue<Runnable>();
public void register(final NioChannel socket) {
        //省略代码...
        PollerEvent r = eventCache.poll();
        //省略代码...
        addEvent(r);
}
8: 启动轮询线程
public void startInternal() throws Exception {

        if (!running) {
                //省略代码...
                // Start poller threads
                pollers = new Poller[getPollerThreadCount()];
                for (int i=0; i<pollers.length; i++) {
                        pollers[i] = new Poller();
                        Thread pollerThread = new Thread(pollers[i], getName() + "-ClientPoller-"+i);
                        pollerThread.setPriority(threadPriority);
                        pollerThread.setDaemon(true);
                        pollerThread.start();
                }
                //省略代码...
        }
}
9: 取出队列中新增的 PollerEvent 并注册到 Selector
public static class PollerEvent implements Runnable {
        //省略代码...
        @Override
        public void run() {
                if ( interestOps == OP_REGISTER ) {
                        try {
                                socket.getIOChannel().register(socket.getPoller().getSelector(), SelectionKey.OP_READ, key);
                        } catch (Exception x) {
                                log.error("", x);
                        }
                } else {
                        //省略代码...
                }//end if
        }//run
        //省略代码...
}
10: Selector.select()
public void run() {
        // Loop until destroy() is called
        while (true) {
                try {
                        //省略代码...
                        try {
                                if ( !close ) {
                                        if (wakeupCounter.getAndSet(-1) > 0) {
                                                keyCount = selector.selectNow();
                                        } else {
                                                keyCount = selector.select(selectorTimeout);
                                        }
                                        //省略代码...
                                }
                                //省略代码...
                        } catch ( NullPointerException x ) {
                                //省略代码...
                        } catch ( CancelledKeyException x ) {
                                //省略代码...
                        } catch (Throwable x) {
                                //省略代码...
                        }
                        //省略代码...

                        Iterator<SelectionKey> iterator =
                                keyCount > 0 ? selector.selectedKeys().iterator() : null;

                        while (iterator != null && iterator.hasNext()) {
                                SelectionKey sk = iterator.next();
                                KeyAttachment attachment = (KeyAttachment)sk.attachment();

                                if (attachment == null) {
                                        iterator.remove();
                                } else {
                                        attachment.access();
                                        iterator.remove();
                                        processKey(sk, attachment);//此方法跟下去就是把 SocketProcessor 交给 Excutor 去执行
                                }
                        }//while

                        //省略代码...
                } catch (OutOfMemoryError oom) {
                        //省略代码...
                }
        }//while
        //省略代码...
}
11: 根据选择的 SelectionKey 构造 SocketProcessor 提交到请求处理线程
public boolean processSocket(NioChannel socket, SocketStatus status, boolean dispatch) {
        try {
                //省略代码...
                SocketProcessor sc = processorCache.poll();
                if ( sc == null )
                        sc = new SocketProcessor(socket,status);
                else
                        sc.reset(socket,status);
                if ( dispatch && getExecutor()!=null )
                        getExecutor().execute(sc);
                else
                        sc.run();
        } catch (RejectedExecutionException rx) {
                //省略代码...
        } catch (Throwable t) {
                //省略代码...
        }
        //省略代码...
}
NioBlockingSelector 和 BlockPoller
NioEndpoint 对象中维护了一个 NioSelecPool 对象,这个 NioSelectorPool 中又维护了一个 BlockPoller 线程,这个线程就是基于辅 Selector 进行 NIO 的逻辑:执行 servlet 后,得到 response,往 socket 中写数据为例,最终写的过程调用 NioBlockingSelector 的 write 方法。代码如下:
public int write(ByteBuffer buf, NioChannel socket, long writeTimeout,MutableInteger lastWrite) throws IOException {
        SelectionKey key = socket.getIOChannel().keyFor(socket.getPoller().getSelector());
        if ( key == null )
                throw new IOException("Key no longer registered");
        KeyAttachment att = (KeyAttachment) key.attachment();
        int written = 0;
        boolean timedout = false;
        int keycount = 1; //assume we can write
        long time = System.currentTimeMillis(); //start the timeout timer
        try {
                while ( (!timedout) && buf.hasRemaining()) {
                        if (keycount > 0) { //only write if we were registered for a write
                                //直接往 socket 中写数据
                                int cnt = socket.write(buf); //write the data
                                lastWrite.set(cnt);
                                if (cnt == -1)
                                        throw new EOFException();
                                written += cnt;
                                //写数据成功,直接进入下一次循环,继续写
                                if (cnt > 0) {
                                        time = System.currentTimeMillis(); //reset our timeout timer
                                        continue; //we successfully wrote, try again without a selector
                                }
                        }
                        //如果写数据返回值 cnt 等于 0,通常是网络不稳定造成的写数据失败
                        try {
                                //开始一个倒数计数器
                                if ( att.getWriteLatch()==null || att.getWriteLatch().getCount()==0)
                                        att.startWriteLatch(1);
                                //将 socket 注册到辅 Selector,这里 poller 就是 BlockSelector 线程
                                poller.add(att,SelectionKey.OP_WRITE);
                                //阻塞,直至超时时间唤醒,或者在还没有达到超时时间,在 BlockSelector 中唤醒
                                att.awaitWriteLatch(writeTimeout,TimeUnit.MILLISECONDS);
                        }catch (InterruptedException ignore) {
                                Thread.interrupted();
                        }
                        if ( att.getWriteLatch()!=null && att.getWriteLatch().getCount()> 0) {
                                keycount = 0;
                        }else {
                                //还没超时就唤醒,说明网络状态恢复,继续下一次循环,完成写 socket
                                keycount = 1;
                                att.resetWriteLatch();
                        }

                        if (writeTimeout > 0 && (keycount == 0))
                                timedout = (System.currentTimeMillis() - time) >= writeTimeout;
                } //while
                if (timedout)
                        throw new SocketTimeoutException();
        } finally {
                poller.remove(att,SelectionKey.OP_WRITE);
                if (timedout && key != null) {
                        poller.cancelKey(socket, key);
                }
        }
        return written;
}
当 socket.write() 返回 0 时,说明网络状态不稳定,这时将 socket 注册 OP_WRITE 事件到辅 Selector,由 BlockPoller 线程不断轮询这个辅 Selector,直到发现这个 socket 的写状态恢复了,通过那个倒数计数器,通知 Worker 线程继续写 socket 动作。看一下 BlockSelector 线程的代码逻辑:
public void run() {
        while (run) {
                try {
                        ......

                        Iterator iterator = keyCount > 0 ? selector.selectedKeys().iterator() : null;
                        while (run && iterator != null && iterator.hasNext()) {
                                SelectionKey sk = (SelectionKey) iterator.next();
                                KeyAttachment attachment = (KeyAttachment)sk.attachment();
                                try {
                                        attachment.access();
                                        iterator.remove(); ;
                                        sk.interestOps(sk.interestOps() & (~sk.readyOps()));
                                        if ( sk.isReadable() ) {
                                                countDown(attachment.getReadLatch());
                                        }
                                        //发现 socket 可写状态恢复,将倒数计数器置位,通知 Worker 线程继续
                                        if (sk.isWritable()) {
                                                countDown(attachment.getWriteLatch());
                                        }
                                }catch (CancelledKeyException ckx) {
                                        if (sk!=null) sk.cancel();
                                        countDown(attachment.getReadLatch());
                                        countDown(attachment.getWriteLatch());
                                }
                        }//while
                }catch ( Throwable t ) {
                        log.error("",t);
                }
        }
        events.clear();
        try {
                selector.selectNow();//cancel all remaining keys
        }catch( Exception ignore ) {
                if (log.isDebugEnabled())log.debug("",ignore);
        }
}
使用这个辅 Selector 主要是减少线程间的切换,同时还可减轻主 Selector 的负担